Content
Seedlings are grown in early spring when daylight hours are still short. Artificial lighting solves the problem of lack of light, but not every lamp equally useful. For plants, parameters such as intensity and spectrum are important. The optimal solution is seedling illumination LED strip, self-assembled in a few minutes.
The benefits of artificial lighting
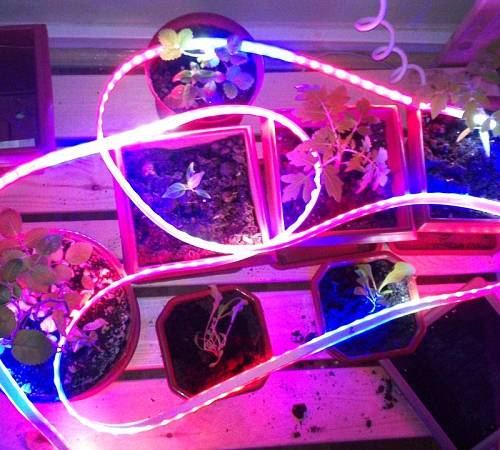
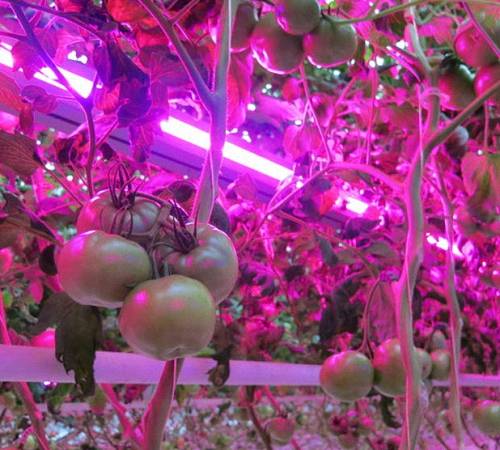
Lack of light negatively affects the development of seedlings. In plants, photosynthesis is inhibited, leaves and stems begin to fade. Vegetable growers solve the problem by installing artificial lighting from lamps. A yellow or white glow has a positive effect on the process of photosynthesis, but does not bring other benefits. The entire necessary spectrum contains sunlight, which promotes the development of cells, leaf plates, and the formation of inflorescences. Illumination of seedlings with LED strips of different luminescence allows you to get as close to the indicator as possible.
LEDs emit the spectrum required by the seedlings, which is available in natural light. Scattered rays are better captured by plants. To obtain them, reflectors are installed from mirrors or foil. Of the entire emitted spectrum, three colors are especially useful for seedlings:
- blue - stimulates growth;
- red - accelerates the formation of inflorescences;
- pink - combines the useful features of blue and red.
To get the full spectrum, they began to use strips to illuminate seedlings from LEDs of different luminescence.
In the video, the illumination of seedlings with LED strip:
Pros of using LED strips
LEDs have the main advantage - they emit the spectrum of light necessary for seedlings, but there are also a number of important advantages:
- the tape consumes little electricity;
- LEDs emit light waves of different lengths, which are better absorbed by plants;
- the tape is designed for a long service life;
- low voltage operation makes the LED strip fire and electrical safe;
- LEDs have minimal flicker, no UV and IR radiation;
- LEDs are environmentally friendly due to the absence of harmful substances such as mercury.
The downside is cost. The price of a good LED strip with a power supply is 7-10 times more than a cheap LED bulb, but the backlight will pay off in a couple of years.
Lighting installation rules
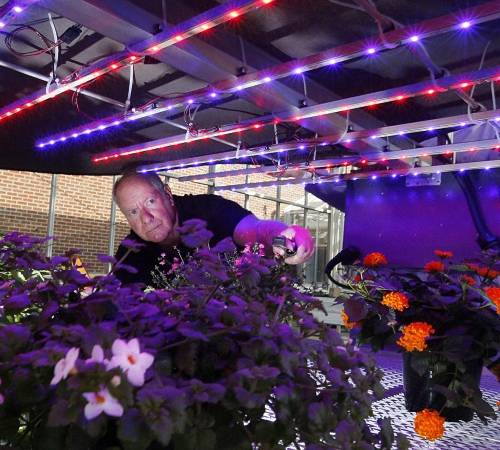
The illumination for seedlings on the windowsill is equipped with an LED strip so as to exclude the ingress of moisture on the electrical part as much as possible. Light sources are fixed at the top above the plants. You can glue the glowing strip to the back of the shelf on the top tier of the rack. Reflectors are placed on the sides of the seedling box. In this position, the mirror surface diffuses light better.
When growing a large number of seedlings, large racks with five shelves and place them on the floor. The remoteness of the structure from the window requires an increase in the illumination time. So that the LEDs do not overheat from long-term operation, the tapes are glued to the aluminum profile.
If the illumination is fixed to the back side of the shelf of the upper tier of the rack, then the possibility of adjusting the height of the illumination is excluded. The light source should be located above the seedlings with a gap of 10 to 40 cm. LEDs practically do not emit heat.The risk of foliage burns is excluded, and this allows you to set the optimal gap - 10 cm.
When sprouting sprouts, the lighting device must be as close as possible to the boxes. The seedlings grow vigorously, and with it the raising of the light source is required to maintain the gap. For this reason, it is better not to firmly attach the LED strip to the shelves of the rack, but to make a separate lamp from an aluminum profile or a wooden bar. A home-made lighting device is fixed with ropes to the lintels of the rack and, if necessary, is lowered or raised.
Choosing a strip for backlighting
Many vegetable growers are scared not by the cost of the LED strip, but by the lack of experience in choosing and connecting it. There is nothing difficult in this. Now we will look at how to choose an LED strip for illuminating seedlings and what other details are required.
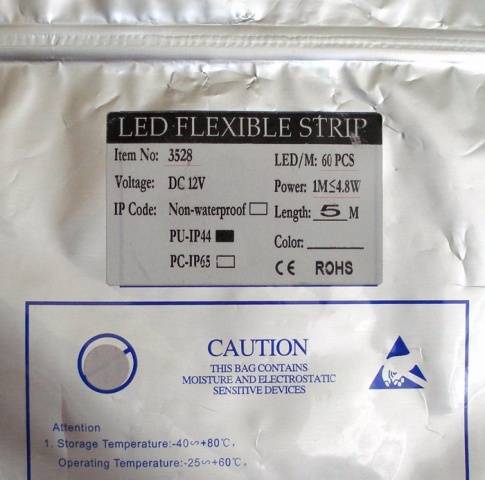
All tapes are sold in lengths of 5 m, wound on a roll. It will have to be cut to the size of the shelves of the rack, and the pieces will have to be connected with wires. Aluminum rulers with soldered LEDs are an alternative. The metal base serves as a cooler. The rulers are produced in different lengths and it is easier to choose them for the size of the rack, but the cost of the product is slightly more expensive than the tape.
When buying an LED strip, they look at the following characteristics:
- The brightness of the glow. The LEDs are identified by a four-digit number. The higher the value, the brighter the tape emits light.
- The volume of light. A certain number of LEDs are soldered to 1 m of the base: 30, 60 and more pieces. With an increase in the number of bulbs, the LED strip emits more light.

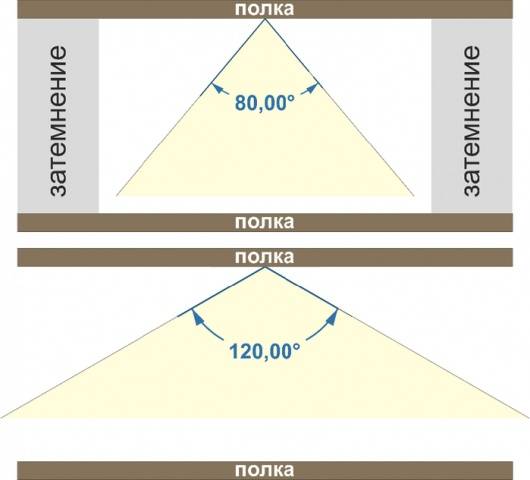
- LEDs differ in light angle. Bulbs are available with an indicator of 80 or 120about... When using one tape to illuminate a large area, it is better to choose a product with a glow angle of 120about.
- In order not to be confused in the four-digit number of the LED designation and their number, you can simply read the marking on the product packaging for the luminous flux value indicated by Lumens (Lm).
- The cost of a tape with the same number of LEDs and their number is different. As an example, the photo shows a comparison of two products, where LEDs with the number 5630 are used in the amount of 60 pcs / 1 m, but the power and volume of light are different.
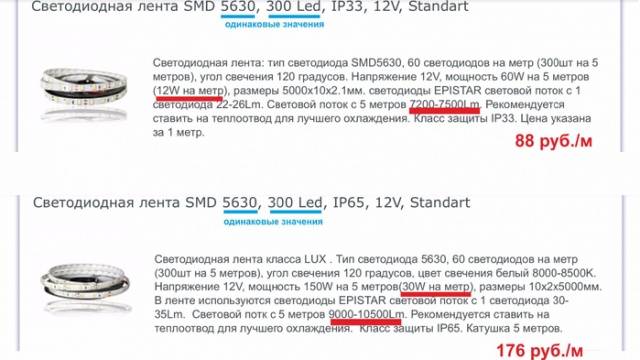
It is optimal for the illumination of seedlings to choose a product with the number of LEDs 5630, a power of 20 W / m and a glow angle of 120about.
An important indicator is the power of the LEDs. The higher the value, the more heating occurs. For heat dissipation, aluminum profiles are sold. When making a homemade backlight, you should not save on this element.
The ribbons are sold in different colors. For plants, it is optimal to use two colors: blue and red. If the seedlings are in the room, such lighting creates discomfort for vision. The optimal solution to the problem would be to manufacture a luminaire with warm white LEDs.
LEDs operate on direct current with a voltage of 12 or 24 volts. Connection to the outlet is via the power supply. In terms of power, the rectifier is selected with a margin. If you take it back to back, then the electronic device will quickly fail from overheating. For example, the power of 5 m of tape is 100 watts. A 120–150 W power supply will do. More is better than less.
Assembling the LED backlight
To make the lamp, you need a strip equal to the length of the shelf of the seedling rack. You can use a wooden beam, but it is better to buy an aluminum profile. It will be neater, plus the side walls will act as a cooler.
If white LEDs are selected for illumination, one luminous strip is enough above the shelf with seedlings.With a combination of red and blue LEDs, a lamp is made of two strips. For pairing, aluminum profiles are screwed to a wooden strip parallel to each other with self-tapping screws.
The LED strip is cut to the length of the profile. The location of the cut can be easily identified by the scissor pattern applied. Two wires are soldered to one end or a connecting connector is installed. On the back of the LEDs there is an adhesive layer covered with a protective film. You need to remove it and stick the tape on the aluminum profile.
The lamp is ready. Now it remains to connect the LED strip for illuminating the seedlings to the power supply. The LEDs will light up if the polarity is correct: plus and minus. Phase and zero markings are printed on the power supply. There are “+” and “-” marks on the tape at the place where the wires are soldered. The wire coming from the minus is connected to the zero contact on the power supply, and the positive wire to the phase contact. If connected correctly, after applying voltage, the homemade lamp will light up.
The video demonstrates the manufacture of the lamp:
Luminaires are made in the same way as the number of shelving shelves. A homemade lighting fixture is suspended from a rope above the seedlings. With the growth of plants, the lamp is raised higher, maintaining a gap of at least 10 cm.